• Quick-fix strategies for minor roof damages to prevent further issues
• Importance of addressing roofing problems immediately to reduce long-term costs
• Advantages of professional roof repair services for lasting solutions
Identifying the Early Warning Signs of Roof Damage
Roof damage can be a silent culprit, sneaking up on you when you least expect it. It’s essential to stay vigilant and recognize the early warning signs before they escalate into significant issues. Common indicators of a compromised roof include missing shingles, which might leave your roof vulnerable to the elements, or shingles that appear cracked or curled from wear and tear. Spotting these signs early can save you time and money, making minor repairs manageable before they become major undertakings.
Understanding the Impact of Minor Roof Damage
Though often overlooked, even minor roof damage can have a pronounced impact on the integrity of your home. Loose materials or granules in your gutters can hint at potential shingle breakdown, while wear around roof penetrations like chimneys and vents suggests sealant failures. Furthermore, these seemingly insignificant problems can lead to leaks, which, if undetected, can contribute to more severe structural damage. Monitoring for these changes is a critical step in upholding the health of your roof.
Proactive Measures to Prevent Roof Damage Spread
The best defense against roof damage is a good offense; being proactive can make all the difference. Conduct regular inspections, especially after instances of severe weather, to catch potential concerns. Ensure that you attend to any signs of damage immediately, prioritizing the repairs to prevent further spreading. A vigilant approach will extend the life of your roof and safeguard your home against future damage.
Gathering the Right Tools for the Job
Before embarking on repairing your roof, it’s crucial to arm yourself with the correct tools and materials. A sturdy ladder, a reliable hammer, and a sharp utility knife are foundational to getting the job done right. Roofing nails and a hardy sealant will ensure your repair work can withstand the tests of time and weather. Assembling these items before beginning the work not only streamlines the process but also ensures you stay focused on the task at hand without unnecessary interruptions.
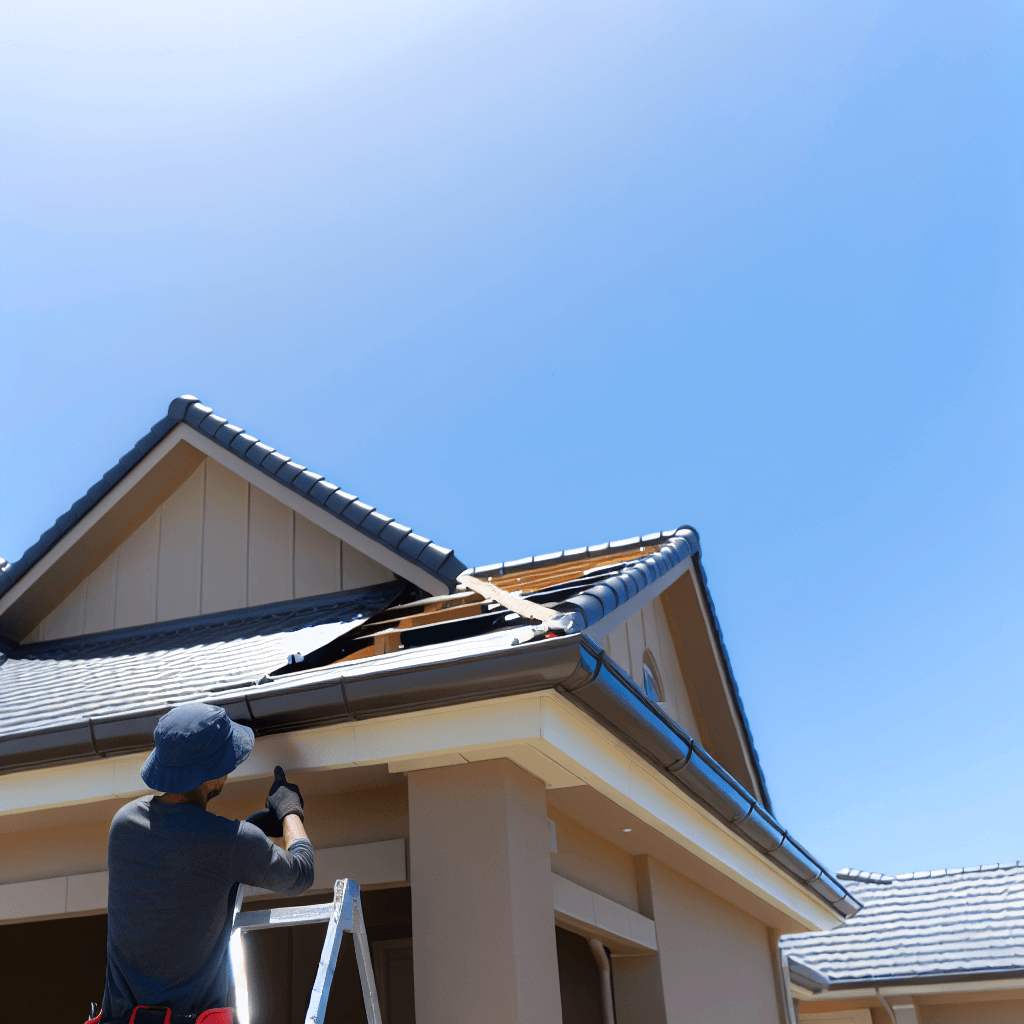
Preparation Is the Key to Successful Repairs
Starting your repair process on the right foot involves more than just having the tools at hand; it’s about creating a safe and workable space. Wearing non-slip shoes, secure the ladder, and if you’re working on a particularly steep incline, don’t hesitate to use safety ropes. Clear the roof of debris and loose objects to prevent accidents and to provide a clean surface for working. It’s measures like these, outlined by Adam Quenneville’s expert team, that not only guarantee a smoother repair experience but also ensure your personal safety.
Step 1: Assess the Damage
Begin by carefully examining your roof to identify the extent of the minor damage. Look for missing, cracked, or curling shingles, as well as any loose material or wear around chimneys, vents, and pipes.
Step 2: Gather Your Tools and Materials
Gather the necessary tools such as a ladder, hammer, roofing nails, utility knife, and roofing sealant. Ensure you also have the matching replacement shingles ready.
Step 3: Secure the Surrounding Area
To ensure safety, secure the ladder and wear non-slip shoes. If needed, use safety ropes or harnesses. Remove any debris or loose objects from the roof before starting the repair.
Step 4: Remove Damaged Shingles
Using the utility knife and hammer, carefully remove the damaged shingles. Be gentle to avoid causing any further damage to the roof.
Step 5: Prepare the Area for Repair
Clean the area where the shingle was removed, making sure it is free from debris, granules, and any protruding nails that could deter the new shingle from laying flat.
Step 6: Install the New Shingle
Slide the new shingle into place, making sure it aligns with the surrounding shingles. Secure it with roofing nails, generally one at each corner of the shingle, then cover the nail heads with roofing sealant to prevent leaks.
Step 7: Seal the Shingles
Apply a generous amount of roofing sealant under the edges of the surrounding shingles to ensure the new shingle is fully integrated and that there are no gaps for water to seep through.
Step 8: Inspect Your Work
After the sealant has dried, inspect your work to ensure there are no visible gaps or misalignment. Ensure the repair is flush with the rest of the roof to prevent wind lift or additional damage.
Common DIY Roof Repair Mistakes to Avoid
When you take on the task of repairing your roof, you’re not just fixing shingles; you’re protecting your home from potential damage. However, well-intentioned efforts can lead to further problems if you’re not careful. It’s imperative to be mindful of the pitfalls that can occur when attempting to repair roof damage by yourself. To help you navigate this process, we’ve compiled a list of common mistakes to avoid, ensuring your DIY roof repair is both effective and safe.
Mistake 1: Ignoring Safety Precautions
Many homeowners underestimate the risks involved in roof repairs. Always secure the ladder, wear non-slip shoes, and consider using safety harnesses. Overlooking these critical safety measures can lead to accidents and injuries.
Mistake 2: Misjudging the Extent of Damage
Failing to properly assess the damage can result in incomplete repairs. It’s essential to check not only the visible areas but also under the shingles and around roof fixtures. This misstep can allow unseen damage to worsen over time.
Mistake 3: Using Improper Tools and Materials
Choosing the wrong tools or substandard materials can compromise your repair. Ensure the materials match your existing roof and that your tools are appropriate for the task. Incorrect materials can fail to protect your home, while the wrong tools can cause additional damage.
Mistake 4: Neglecting Proper Shingle Removal Techniques
Ripping out damaged shingles with excessive force can damage the surrounding area. Gently remove shingles using the appropriate technique to maintain the integrity of the roof. This helps prevent creating more work and the need for further repairs.
By being aware of these common mistakes and arming yourself with the right information, you can approach your DIY roof repair with confidence and precision. Remember, taking the time to do the job correctly can save you from costly repairs in the future.
I’m ready to assist with generating this content, but I need to know the anchor text to use for the internal link before continuing. Could you please provide it?


