• Spot early warning signs: Learn how to identify issues with your existing roof shingles, preempting costly repairs
• Step-by-step guide: Follow detailed instructions on shingling your roof, from removal to installation, tailored for Connecticut homes
• Expert tips and mistakes to avoid: Gain insights on typical DIY pitfalls in roofing and how to sidestep them for a successful project
Recognizing When It’s Time for a New Roof
Home ownership comes with the responsibility of maintenance, and the roof is a crucial component of your home’s defense against the elements. Over time, a roof may exhibit signs of significant wear, such as cracked or curled shingles, which can indicate that it’s due for a refresh. If you notice any missing shingles or detect a sunlight peeking through the attic, these are clear indicators that your roof’s integrity might be compromised. Ignoring these signs can lead to more severe damage, making it essential to act promptly.
In our summer season, Connecticut homes are exposed to various weather conditions that can accelerate roof damage. Algae growth, for instance, can cause dark streaks on shingles, while heavy rain and wind can loosen or remove them entirely. A sagging roof deck or visible leaks during rainy weather are also tell-tale signs that it’s time to consider how to shingle a roof. Taking preemptive steps to address these issues can prevent larger, more costly repairs down the line.
Before you begin the journey of replacing your roof shingles, it’s important to assess the whole roof structure. Feel for soft spots as you walk on the roof, as these may be areas where the wood has begun to rot underneath. Any granules in the gutters or downspouts from shingles are also a clue that they are wearing down. Once you have thoroughly evaluated the condition of your roof and decide that it’s time for a replacement, the next steps will ensure that you are prepared to start this project on the right foot.
Remember, each section of your eventual guide to repairing your roof will build upon the next, ensuring that you address these problems methodically for a result that is not only aesthetically pleasing but resilient and durable.
Preparing for Shingle Replacement
Before diving into the intricacies of shingle installation, it’s essential to prepare your roof and select the right materials. Ensuring you have all the necessary tools and materials beforehand will make the process smoother and more efficient. Gather your shingles, roofing nails, hammer, pry bar, underlayment, and other necessary items, ensuring they are suited to Connecticut’s summer climate. Selecting high-quality materials and tools will contribute to a long-lasting roof that can withstand the elements.
If you’re unsure about material selection, consider consulting with professionals who can offer you a range of options. For example, selecting the appropriate roofing materials is crucial for the integrity and longevity of your roof. Each material has its set of advantages, whether it’s traditional asphalt shingles or modern metal roofing. Expert guidance can help tailor the selection to your particular needs and the local weather patterns.
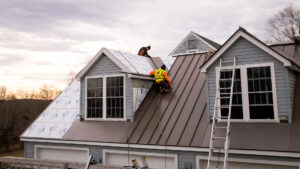
Removing the Old Shingles
Once the preparation phase is complete, it’s time to tackle the removal of the old shingles. Start at the roof’s peak and work your way down, prying up shingles and stripping them away carefully. This part of the process requires patience and thoroughness to avoid damaging the roof decking. As you go, it may be tempting to rush, but remember that careful removal is key to a successful installation.
Dispose of the old shingles and underlayment properly, adhering to local waste management guidelines. This not only keeps your workspace clear and safe but also ensures you’re respecting the environment. A clean work area will also provide a solid foundation for laying down the new underlayment and shingles. It’s a critical step for ensuring your new roof will offer the protection your home needs.
Step 1: Prepare Your Roofing Area
Begin by inspecting the roof and clearing any debris. Make sure to choose a dry day, as moisture can affect the installation process. Safety should be a priority, so wear a harness and ensure your ladder is secure.
Step 2: Remove Old Shingles
Carefully strip away the existing shingles and underlayment. Dispose of the old materials responsibly. Check the wooden decking beneath for damage and make repairs as necessary.
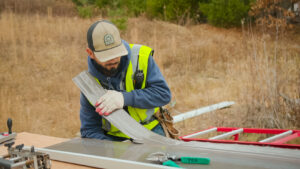
Step 3: Install Underlayment
Lay down a new underlayment, which acts as a barrier against water. Start at the bottom edge of the roof and work your way up, overlapping each layer as specified by the manufacturer.
Step 4: Plan for Shingle Layout
Measure and mark your guide for the first row of shingles to ensure they are aligned correctly. This is critical for a uniform look and proper roof coverage.
Step 5: Lay the Starter Shingles
The starter shingles help prevent leaks at the edges of the roof. Install them along the eaves, making sure they overhang slightly as recommended.
Step 6: Install Roof Shingles
Begin installing the shingles from the bottom corner of the roof, working in rows. Nail the shingles as advised by the shingle manufacturer, usually with four nails per standard shingle.
Step 7: Work Around Roof Features
When you approach features like vents or chimneys, you may need to cut shingles for a proper fit. Use a utility knife and follow safety precautions while cutting.
Step 8: Seal and Inspect the Roof
After all the shingles are installed, use a roofing sealant to seal edges and nail heads. Inspect the entire roof to ensure all shingles are secure and the pattern is uniform. Address any issues immediately for the best results.
Avoiding Common Roofing Mistakes
DIY roofing projects can be rewarding but also challenging; even the most diligent homeowners can make mistakes. Understanding these potential pitfalls is key to ensuring a stable and long-lasting roof. Here we’ll discuss several common errors to watch out for, rooted in the steps of the shingle installation process.
Mistake 1: Neglecting Roof Safety
– Many homeowners underestimate the importance of safety when preparing their roofing area.
– To avoid accidents, always use a harness, secure the ladder properly, and avoid working in inclement weather or when the roof is wet.
Mistake 2: Improper Removal of Old Shingles
– Rushing the removal of old shingles can cause damage to the deck beneath, leading to further repairs and costs.
– Take the time to carefully remove shingles and underlayment, check for damage, and make necessary repairs before proceeding.
Mistake 3: Overlooking the Underlayment
– Skimping on underlayment or poor installation can lead to leaks and water damage.
– The underlayment must be laid smoothly and overlapped correctly according to manufacturer specifications to provide an effective water barrier.
Mistake 4: Incorrect Shingle Alignment
– Incorrect measurements or haphazard shingle layout can lead to an uneven roof appearance and potential exposure to the elements.
– Measure and plan the shingle layout meticulously, ensuring each row is straight and uniformly aligned.
Mistake 5: Starter Shingles Misplacement
– Starter shingles are essential for waterproofing the edges of your roof but placing them incorrectly can result in leaks.
– Install starter shingles along the eaves with the proper overhang as recommended to prevent water from seeping underneath.
Mistake 6: Inappropriate Nailing Technique
– Incorrect nailing can compromise the stability of your shingles, making them prone to wind uplift or shifting.
– Follow the nailing pattern provided by the shingle manufacturer and use the recommended number of nails per shingle.
Mistake 7: Neglecting Roof Features
– Failing to correctly work around vents, chimneys, or other roof features can prevent a proper seal and might lead to leaks.
– Take the time to properly cut and fit shingles around these elements, ensuring a tight, waterproof fit.
Mistake 8: Inadequate Sealing and Inspection
– Skipping the final step of sealing and inspecting the roof could result in small problems turning into big ones.
– Use roof sealant on edges and nail heads, and conduct a thorough inspection to address any issues immediately, ensuring a secure and complete installation.
Laying the Foundation: Underlayment Installation
Following the removal of old shingles, the next critical step is to lay down the new underlayment, the protective layer that shields your home from water intrusion. It serves as an extra barrier against leaks, particularly important in regions with unpredictable summer storms like Connecticut. Ensure the underlayment is flat and secure before proceeding, as wrinkles or gaps could compromise the roof’s integrity.
It’s also the stage to address any ventilation issues or replace worn-out flashing—tasks that contribute significantly to the roof’s overall performance. Proper installation helps in extending the life of your shingles and maintains your home’s energy efficiency. If you’re unsure about how to handle these aspects, consider reaching out to specialists at residential roofing services for expert advice.
Effective Shingle Installation
With the underlayment in place, you can begin installing the new shingles. Start from the bottom edge and work up, carefully aligning each row horizontally. It’s essential to follow the manufacturer’s recommendations on nailing patterns to ensure the shingles hold firm, especially against Connecticut’s summer winds.
Be mindful of the shingle overhang at the eaves, as it directs water away from the fascia and into the gutters. This attention to detail will not only improve the roof’s functionality but also its overall appearance. A well-executed shingle installation not only defends your home against the elements but also enhances its curb appeal with a clean, uniform look.