• Understand common storm damage signs and document all affected areas for insurance claims.
• Follow expert tips for implementing temporary fixes and safely cleaning up post-storm.
• Contact professional services for thorough inspection and repairs to avoid costly mistakes.
Recognizing the Warning Signs of Storm Damage
When the skies clear after a turbulent storm in Vermont, it’s crucial to know how to spot the heralds of potential trouble on your property. Look for missing shingles, dents in your siding, and cracked windows, as these are clear indicators that your home has suffered from the storm’s fury. It’s not just about the visible damage; listen for unusual sounds in your home that might point to hidden issues like a cracked foundation. Always approach this task with a mindset focused on safety; storms can leave behind dangerous debris and unstable structures.
Beyond the Surface: Uncovering Subtle Storm Impacts
Although catastrophic damage will capture your attention first, don’t overlook the subtle signs that could escalate into major problems if left unchecked. Water stains on ceilings or walls, for example, suggest a breached roof or siding, which can lead to internal structural decay. Sudden drafts or uneven temperature in rooms might indicate compromised insulation or window seals. Before you even pick up the phone to call for help, make sure you have a comprehensive set of photos documenting every bit of damage; this visual evidence is invaluable for insurance claims and repair strategies.
Preparing for the Next Steps
Once you’ve surveyed the scene and tallied the toll, your initial findings will lay the groundwork for the subsequent phases of recovery. If water has made its way inside, act swiftly to curb moisture before mold takes hold—a concern especially pertinent during Vermont’s humid summer months. Equip yourself for temporary patch-ups; a well-placed tarp or plywood can make all the difference in keeping further elements at bay. Above all, stay aware of the risks posed by the storm’s aftermath, including downed power lines or compromised structural integrity, and alert professionals to these hazards during your initial inspections.
Temporary Measures to Protect Your Property
As you navigate through the aftermath of a storm, taking immediate action can significantly reduce the extent and cost of repairs. Placing weighty tarps over exposed areas can prevent water infiltration until permanent fixes are in place. For shattered windows, secure plywood over the openings to maintain the security of your property and reduce the risk of theft or further damage from the elements. These temporary solutions are essential, buying you valuable time as you arrange for professional assessments and repairs.
Initiating the Insurance Claim Process
Your next step in coping with storm damage should be to promptly contact your insurance provider. With the photographic evidence collected, itemize the damages and present a clear case to your insurer. This transparency will help expedite the claims process and lead to a fair assessment of repair costs. Remember, detailed records and open communication with your insurance company are your strongest allies in seeking the most favorable outcome for your property reparations.
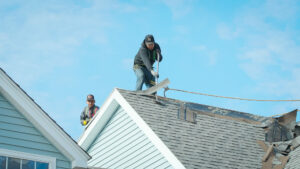
Step 1: Assess the Damage Safely
After the storm has passed and it is safe to do so, take a walk around your property to evaluate the storm damage. Look for apparent signs of damage to the roof, siding, windows, and outdoor structures. Remember to document everything with photos, as these will be useful for insurance claims.
Step 2: Temporary Fixes
For immediate concerns like leaking roofs or broken windows, apply temporary fixes such as tarps or plywood. This can help minimize further water damage until professionals can perform repairs.
Step 3: Contact Your Insurance Company
Initiate a call to your insurance provider to report the damage. Provide them with the documentation you’ve compiled. They will guide you on the next steps and how to proceed with filing a claim.
Step 4: Avoid Secondary Dangers
Be wary of hazards such as downed power lines, standing water, and structural damage. Keep a safe distance from these dangers, and report them to the appropriate authorities or utility companies.
Step 5: Schedule Professional Inspections
Contact certified contractors to inspect your property for hidden damages that may not be immediately apparent, such as electrical issues or compromised structural integrity.
Step 6: Remediate Water Damage
If there’s been water intrusion, quickly addressing water damage and mitigating the risk of mold is crucial. Consider hiring a professional water remediation service if the damage is extensive.
Step 7: Plan for Repairs
Based on the professionals’ assessments, plan for the necessary repairs. Obtain estimates from licensed contractors and coordinate the repair timeline with your insurance company’s approval.
Step 8: Implement Preventative Measures
Once repairs are underway, discuss with your contractors any preventative measures you can take to mitigate future storm damage, such as installing impact-resistant windows or reinforcing your roofing system.
Common DIY Mistakes to Avoid After Storm Damage
In the rush to return to normalcy after storm damage, homeowners can make costly errors that exacerbate problems. Understanding these missteps is crucial to ensure the safety and integrity of your property. This guide will help you steer clear of the most common pitfalls encountered during the post-storm recovery phase.
Mistake 1: Neglecting Personal Safety
Homeowners often underestimate the risks of assessing damage, especially when dealing with structural issues. To avoid this, ensure you wear protective gear and only assess damage when it is safe to do so. Confirm that there are no live electrical hazards or unstable structures before proceeding.
Mistake 2: Inadequate Documentation for Insurance Claims
A common oversight is failing to document the extent of damage properly, resulting in insufficient insurance claims. Snap clear photos of all damages from multiple angles immediately after the storm. Adequate documentation can greatly influence the success of your insurance claim.
Mistake 3: Implementing Temporary Fixes Incorrectly
Improperly applied temporary fixes can lead to more damage. Always follow guidelines for applying tarps or boarding up windows, ensuring they are secure and provide effective cover. If unsure, consult a professional.
Mistake 4: Overlooking Hidden Damages
Damage to roofing or internal structures may not always be visible. Schedule a professional inspection rather than assuming everything is fine. Hidden damages can compromise the safety of your home and increase repair costs over time.
Mistake 5: Delaying Water Damage Remediation
Underestimating the speed at which mold can grow leads to delayed action in water damage clean-up. Start drying out affected areas immediately, as mold can develop within 24 to 48 hours of water exposure. Use fans, dehumidifiers, or consider a professional remediation service for severe cases.
Mistake 6: Ignoring Professional Repair Recommendations
Lastly, disregarding professional advice around necessary repairs and preventative measures can be detrimental. Trust in their expertise to guide the repair process and help mitigate future storm damage effectively. It’s important to consider solutions like impact-resistant windows or roof reinforcements as part of the recovery plan.
Navigating Hazards and Professional Inspections
When storm damage occurs, one of your first priorities should be to identify and mitigate any immediate hazards. This includes reporting downed power lines to the utility company and roping off areas that have become unsafe. To ensure a comprehensive understanding of the situation, requesting a professional inspection from a certified contractor is crucial; they will identify damages that are not visible to the untrained eye.
Water Damage and Mold Remediation
Preventing Mold After a Storm
Water intrusion is a common result of storm damage and requires swift action to prevent mold and further damage. Consulting with professionals about water damage remediation can save you from long-term issues associated with mold and mildew. A quick response is essential, as mold can begin to grow within 24 to 48 hours in the right conditions.