• Learn to identify and assess storm damage with a focus on personal safety and property integrity
• Navigate the insurance claims process and select reputable repair services for effective restoration
• Discover common DIY mistakes to avoid and the benefits of choosing professional help for long-term resilience
Spotting the Telltale Signs of Storm Damage
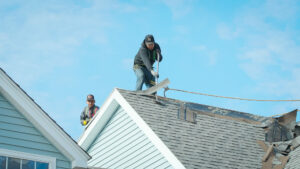
After a storm in Connecticut, your home may wear the scars of Mother Nature’s fury. It’s crucial to inspect for missing shingles on your roof, as these are clear indicators that your property has sustained damage. Equally telling are damaged gutters or siding, which can compromise the integrity of your home’s exterior. Be sure to document these issues meticulously, taking clear photos from various angles to support any future insurance claims.
In your inspection, be mindful of seemingly minor damage, like cracks in windows or minor water damage within the home. These small signs can be the precursors to larger problems and shouldn’t be overlooked. Also, check the surrounding area for downed trees or branches, which suggest that a more detailed property assessment is necessary. Always remember, your safety is paramount; proceed with caution and avoid areas that look structurally unsound.
Prior to initiating any repairs, it’s essential to take steps to prevent further damage. If you identify leaks or openings, temporary fixes such as covering openings with sturdy plastic sheeting or securing tarps over gaps in your roof can be incredibly effective. These initial actions can save you from amplified costs and labor down the line. While it’s natural to want to address all issues immediately, ensure that any emergency measures are implemented safely and properly.
Navigating the Aftermath with a Steady Hand
Upon confirming the extent of storm damage, the focus shifts to ensuring your personal safety and that of your loved ones. Beware of hazards such as exposed nails, shattered glass, or precarious tree limbs that could cause injury. Always assume that downed power lines are live and maintain a safe distance, contacting the utility company for immediate assistance. It’s times like these when a professional assessment becomes invaluable, making certain that all issues, seen and unseen, are acknowledged and addressed.
Preparing for a repair involves more than just identifying the damage—your next crucial step is contacting your insurance provider to report the incident. This process can be intricate, but necessary to secure the funds needed for repairs. For seamless guidance through the claims process, visit wordpress-984317-5678913.cloudwaysapps.com to find out more about navigating insurance claims with expert advice. They can assist you in ensuring your claim is thorough, providing you the means to bring your home back to its pre-storm condition.
Step 1: Assess the Damage
Begin by carefully evaluating the extent of the storm damage around your property. Look for common issues like missing shingles, damaged gutters, broken windows, or downed trees. Document everything with photos for insurance purposes.
Step 2: Ensure Personal Safety
Before addressing any damage, make certain that it’s safe to do so. Check for any potential hazards such as downed power lines or structural damage that could lead to collapse. If you’re uncertain, wait for a professional.
Step 3: Mitigate Further Damage
Take temporary measures to prevent additional damage where possible. This might include covering broken windows with plastic sheeting, placing a tarp over a damaged roof, or removing water from flooded areas to avoid mold growth.
Step 4: Contact Your Insurance Company
Reach out to your insurance provider to report the damage. Your home insurance policy may cover storm damage, and they can guide you through the claims process. Provide the documentation and photos you’ve collected.
Step 5: Choose a Reputable Repair Service
Research and select a trusted local company in Connecticut that specializes in storm damage repair. Ensure they are licensed and insured, and check reviews or ask for recommendations.
Step 6: Arrange for Professional Inspection
Have professionals inspect the damage to provide a detailed assessment and repair plan. This is essential for both your safety and to ensure the integrity of your home’s repairs.
Step 7: Develop a Long-Term Improvement Plan
Consider improvements that can enhance your home’s resilience to future storms, such as stronger roofing materials or updated drainage systems. Review the recommendations with your repair service.
Step 8: Update Your Storm Preparedness
Based on your experience, revise your storm preparedness checklist. This should include an emergency kit, a list of important contacts, and a plan for safeguarding your property in the event of future storms.
Avoiding DIY Disasters: Common Missteps in Post-Storm Repairs
In the wake of a storm, the urge to quickly repair your home can lead to overlooked mistakes that compound existing issues. The desire for swift action is natural, but haste can lead to further property damage or personal injury. Below, we’ve compiled a list of common errors made during DIY storm repair efforts, with advice on how to sidestep these pitfalls for a safer and more effective restoration process.
Mistake 1: Neglecting Personal Safety
Many homeowners rush into repair tasks without assessing the risks, such as electrical hazards or structural weaknesses. Always prioritize safety over speed, and if in doubt, wait for a professional evaluation.
Mistake 2: Inadequate Damage Assessment
A superficial inspection can cause significant damages to be missed. Take the time to thoroughly check for issues like hidden leaks or structural damage that may not be immediately visible. Remember, a detailed evaluation can make all the difference in the insurance claims process.
Mistake 3: Improper Use of Temporary Fixes
It’s vital to apply temporary fixes correctly to mitigate further damage. Poorly placed tarps or hastily applied sealants can lead to more issues if water seeps through. Follow best practice guidelines to ensure temporary fixes are effective and secure.
Mistake 4: Delaying Contact with Insurance
Waiting too long to report damage to your insurance company can jeopardize your coverage. Document damages quickly and reach out to your insurer without delay to start the claims process.
Mistake 5: Choosing the Wrong Repair Service
Not all repair services are created equal, and choosing one based solely on cost can be a grave error. Look for licensed and insured contractors with good reputations and specialized experience in handling storm damage repairs in Connecticut.
Mistake 6: Forgoing Professional Inspection
Some homeowners bypass a professional inspection to save money, but this can lead to undetected issues causing long-term problems. Invest in a comprehensive professional inspection to ensure nothing is missed.
Mistake 7: Underestimating Future Protection
Lastly, overlooking the chance to upgrade to storm-resistant materials and systems during repairs can leave your home vulnerable to future storms. Use the repair opportunity to reinforce your home’s defenses, based on professional recommendations.
Choosing the Right Path to Restoration
Once you’ve managed the immediate concerns and have your insurance claim underway, selecting a reputable repair service becomes the next key step. It’s essential to choose professionals with valid credentials and a strong track record in storm damage repair, particularly in the Connecticut area. Look for specialists who understand the nuances of local weather patterns and can offer robust solutions tailored to your needs, ensuring longevity and durability in their repairs.
The integrity of the repair work on your home is foundational to its future resilience. A thorough professional inspection will not only provide a complete assessment of all damages but will also result in a targeted repair plan, addressing both visible and potential underlying issues. To explore a range of expert repair services that fit your specific needs, consider checking out residential roofing solutions, where you’ll find expertise and experience that ensures effective and efficient restoration of your home.